
How to Manage Condensation Water in an Indoor Cold Plunge?
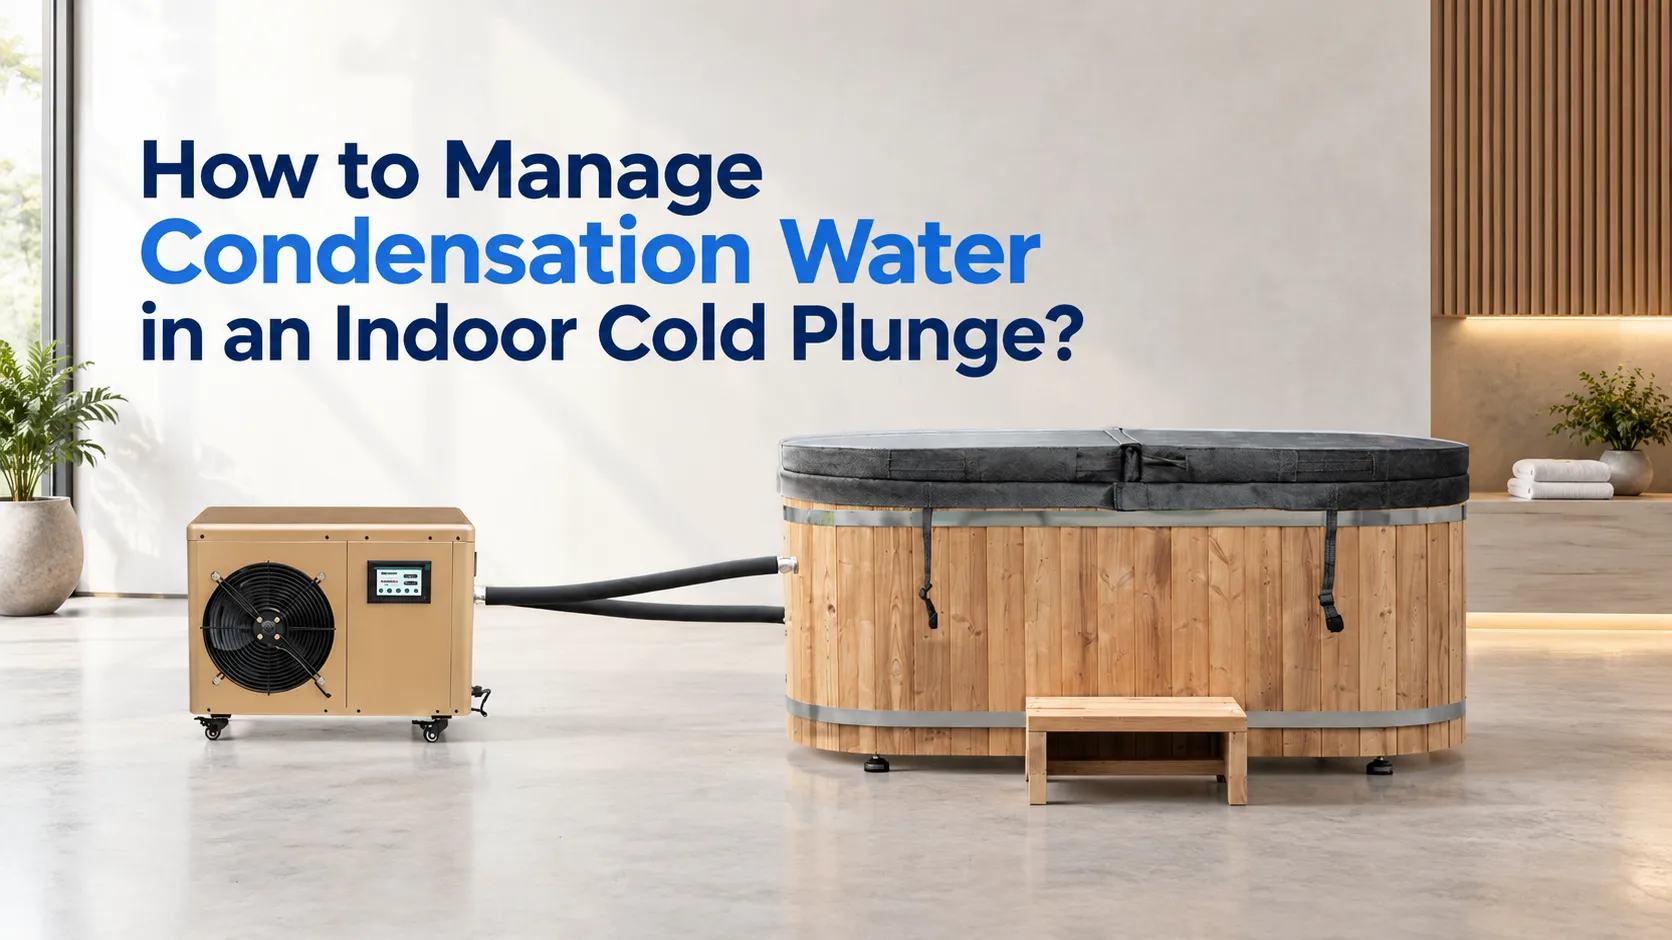
When setting up an indoor cold plunge, many people initially focus only on the tub size, the chiller, and the installation location. Only after using it for a while do they realize that the water around the equipment also needed advance planning — especially for cold tubs for home use.
The water on the floor is not always condensation. People carry water in and out on their bodies, a high water level can cause splashing, low-temperature pipes and metal fittings can develop condensation, and draining, cleaning, or changing the filter of a home cold tub can also bring out residual water. The chiller itself produces condensation during operation, which needs to be drained promptly through the equipment’s drainage design. And if water keeps appearing around the same fitting, pipe leakage is also worth considering.
These types of water may look similar, but they are handled differently. Water carried in by people and splashing is mainly related to water level, entry and exit points, and the drying-off area. Condensation on low-temperature pipes depends on water temperature, indoor temperature, humidity, and pipe insulation. Condensation produced by the chiller itself can be discharged through the equipment’s drain port. As for water from water changes or maintenance, you need to check whether there is a suitable drainage path on site.
So before installing an indoor cold plunge, you should consider not only where the equipment goes, but also surrounding standing water, daily drainage, and future maintenance — all together. This is especially important for spaces without pre-installed floor drains, such as basements, home gyms, spas, and hotels. Planning the drainage in advance can prevent the awkward discovery, after installation, that floor drainage is hard to deal with.
Where Does the Condensation and Splashing Water Actually Come From?
Water Near the Entrance: Carried In or Splashing?
If water stains are mainly concentrated on one side of the entrance and exit of your indoor cold plunge, or are spread along the path users frequently walk, the most likely causes are water carried in by people entering and exiting, as well as splashing during use. Water droplets from the body and wet swimwear drip onto the floor, and standing up or sitting down may also splash out some water.
With commercial cold plunge tubs, usage frequency is much higher. After continuous use by multiple people, obvious standing water is more likely to accumulate near the entrance and exit. In this case, the solution usually starts with adjusting the water level, the entry and exit points, and the drying-off area — there is no need to modify the equipment first.
Water Around the Cold Lines? Condensation or Leakage?
If water droplets mainly appear on the low-temperature pipes and metal fittings between the chiller and the cold plunge tub, and the room is warm and humid, condensation is a likely explanation. Whether a cold surface develops condensation mainly depends on the surface temperature of the equipment, as well as the indoor temperature, humidity, and ventilation.
If the water does not appear evenly across the cold surfaces but keeps concentrating around the same fitting, pipe joint, or filter connection — or even drips continuously — you should check the pipe connections and sealing first. In particular, if water keeps appearing at a fixed spot while the equipment is not running, it is unlikely to be ordinary condensation.
In addition, a small amount of standing water after an ice bath change water, tub cleaning, or filter replacement may simply be residual water brought out during maintenance. If it does not reappear after being wiped dry, there is usually no need to investigate leaks. But if the same spot keeps producing water after the maintenance is finished, then check the connections and sealing.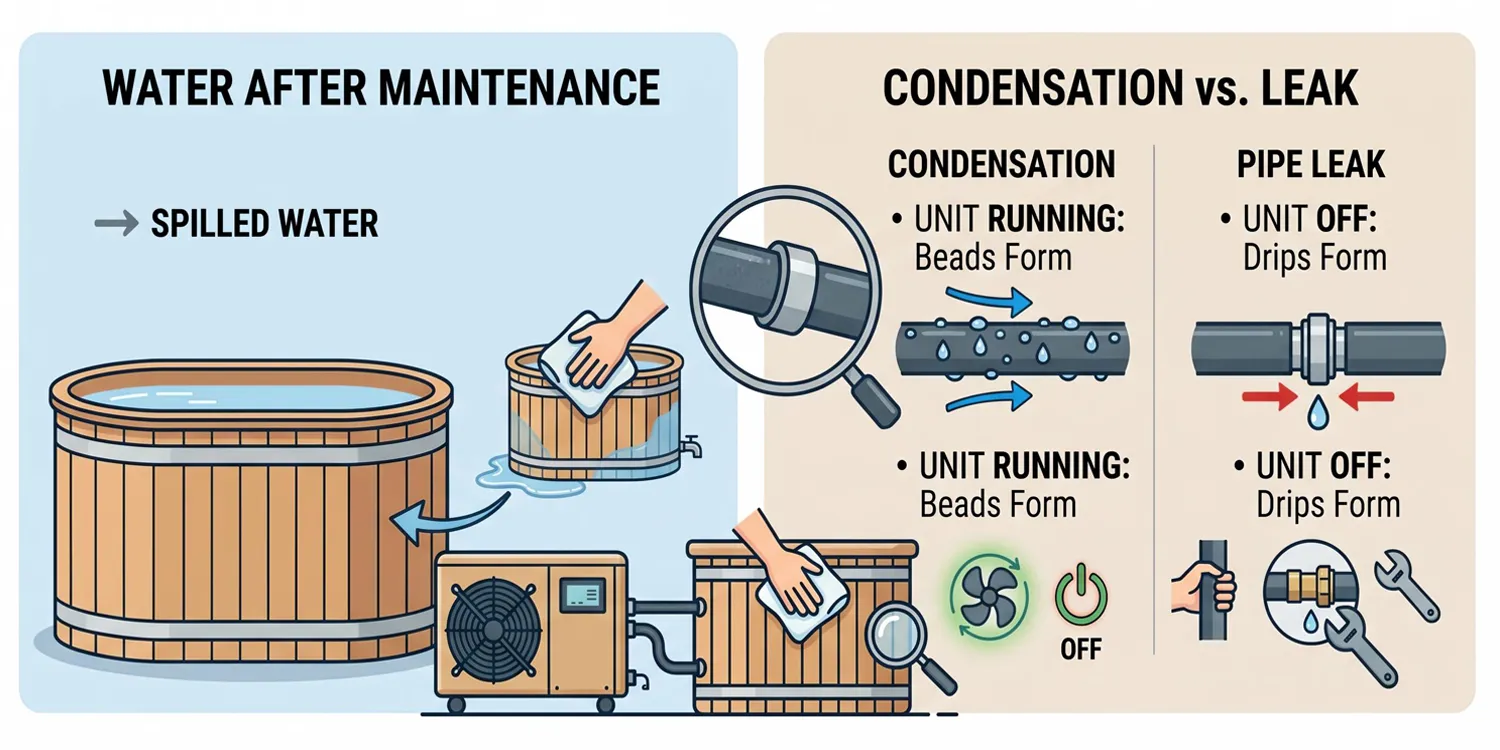
No Floor Drain? How to Handle Water Changes?
Not having a pre-installed floor drain does not mean you cannot install an indoor cold plunge. The key is to first check what drainage systems are available on site, and to plan where the water will go when you do a full water change later.
The small amount of dripping and splashing from daily use is not the same thing as a full ice bath change water. The former can be managed with a drip tray and waterproof flooring, while the latter requires a drainage pump, a sump pit, or other formal drainage paths.
No Drainage Point? A Drainage Pump Can Handle It
For low-usage scenarios such as a home or a small studio, if there is no fixed drainage point on site, a drip tray can be added under the tub to catch daily dripping and small amounts of water spilled during maintenance. When a water change is needed, a cold plunge drain pump and a hose can be used to move the water to a suitable location.
A drip tray can only handle small amounts of water; it cannot replace full-tub drainage. When choosing a drain pump, the main factors to consider are the lift height and the flow rate. Especially in a basement, you need to confirm that the head can cover the vertical height as well as the resistance of the piping itself. The hose should not be bent too much or squeezed, otherwise the actual drainage speed will be affected.
If the basement already has a sump pit and a pump, connecting to the existing system can be an option. But before connecting, you need to confirm whether the sump pit, the pump, and the piping can handle the increased drainage volume, including the pump’s flow rate, lift height, and pipe routing. If the existing system also handles drainage from other areas, make sure that adding cold plunge drainage will not cause slow drainage, standing water, or backflow.
Whichever method you choose, the drained water should go into a suitable drainage point, a sewage collection system, or a drainage facility that meets local requirements. Do not drain it into an unsuitable location just for convenience.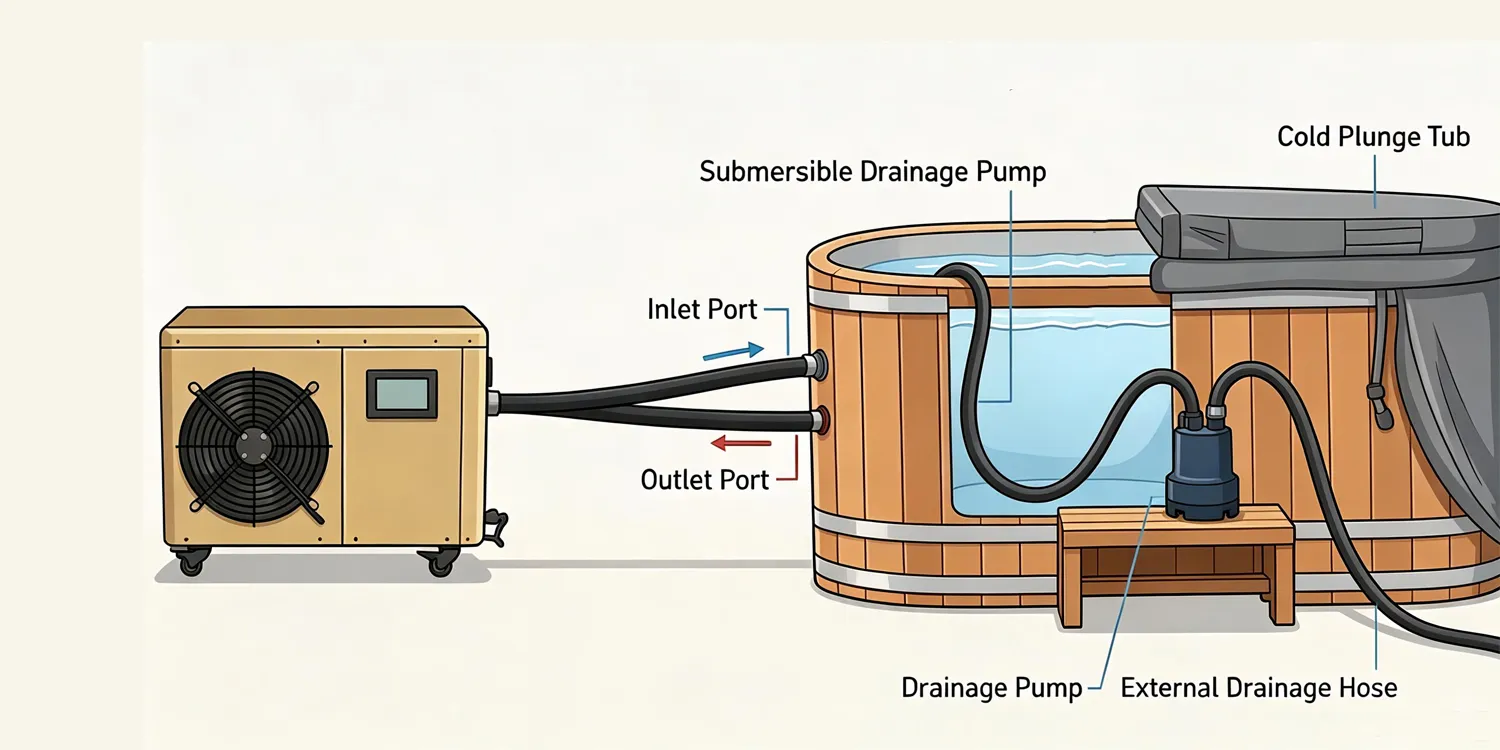
New Projects? Plan a Drainage Point in Advance
For new projects such as gyms, spas, and hotels, it is best to include the drainage points for commercial cold plunge tubs in the plan during the fit-out and mechanical, electrical, and plumbing (MEP) construction stage.
This way, once the equipment is installed, it can be connected directly to the drainage system, making future water changes, cleaning, and maintenance much easier. If the project requires multiple cold plunge tubs, you should also confirm the location, drainage direction, and pipe distance of each unit in advance. This avoids discovering, after all the equipment has been installed, that the drainage points are too far away — which would force you to rework the piping or break up the floor.
How to Reduce Condensation and Splashing Water?
Control Humidity, Insulate Well, and Handle Chiller Drainage
A few water droplets around the cold plunge are completely normal. When the water temperature is low, the pipes and fittings between the chiller and the tub also become cold on the surface. When they meet warm, humid indoor air, condensation is likely to form.
If the room feels humid, start by ventilating it or running a dehumidifier. The exposed low-temperature pipes between the chiller and the tub can also be insulated, which reduces direct contact between the pipe surface and the warm, humid air. Do not just wrap the long pipes — the metal fittings and connection points need attention too, since these areas are just as prone to condensation droplets.
When the chiller is running, condensation can also form inside the equipment. For example, the ColdChiller unit has a drain hole at the bottom, which allows condensation inside the equipment to be drained out. This reduces moisture buildup inside the unit and prevents the drained water from pooling directly around the equipment.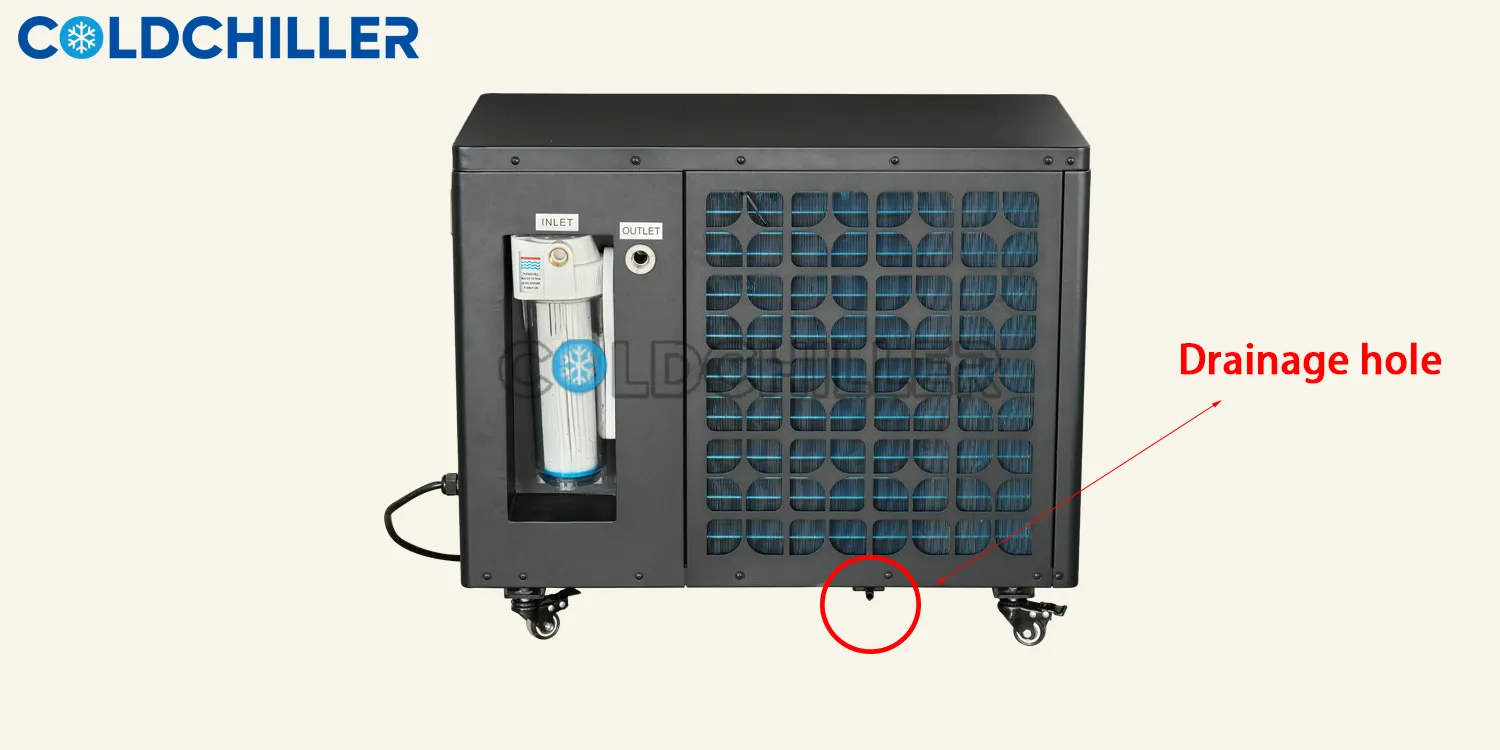
If the cold plunge is installed in a basement or a relatively enclosed room, the humidity is usually higher and condensation becomes more obvious. In this case, in addition to insulating the pipes, you should also leave ventilation space around the equipment, and ideally prepare water catchment and drainage on the floor in advance.
One more thing to distinguish: the droplets are not necessarily all condensation. If water keeps coming from the same spot and gradually gets worse, check the pipes and fittings to see whether there is a leak.
Water Level and The Exit Area Also Affect Splashing
Splashing and water carried in during use are common sources of floor stains, and adjusting the water level and the layout can help a lot.
Do not set the water level too high. When a person gets into the tub, their body displaces some of the water, and if the level is too high, it easily overflows. In commercial settings, it is recommended to set the operating water level based on the actual number of users, rather than filling the tub to its maximum capacity before people get in.
For home use, you can place a waterproof mat or anti-slip mat with drainage gaps at the entrance and exit of the tub. Drying off in the exit area right after getting out can reduce the amount of water carried to other areas.
In commercial venues, it is best to plan the mats, the drying-off area, and the overall drainage system together, leaving enough space for people to stand and stay, so that water does not spread everywhere when the venue is busy. If the cold plunge sits next to a shower area, a sauna, or a fitness zone, also pay attention to user traffic flow, to avoid water being carried all the way into other areas.
Does the Location Matter for an Indoor Cold Plunge?
When installing an indoor cold plunge, you need to consider not only the dimensions of the tub and the chiller, but also the working space required for people to enter and exit, pipe connections, and later maintenance. Confirming the equipment location, water and electrical points, drainage points, and the chiller’s position before installation can reduce the need for adjustments during installation and maintenance later on.
Equipment Installation Space
Do not leave space based only on the dimensions of the tub and the chiller themselves. You also need room for people to enter and exit, pipe routing, later filter changes, and fitting inspections.
If the space is too tight, changing the filter and inspecting the fittings later becomes difficult, and you are more likely to spill water onto the floor during maintenance — which only adds to the standing water problem.
Water, Electrical, and Drainage Points
Before installation, decide the locations of the water inlet, the power supply, and the drainage point. Especially in scenarios without a floor drain, the drainage point directly determines which drainage solution you use and how the pipes are routed. Changing these after the equipment has arrived often means rework.
For commercial projects, it is best to plan these points together with the fit-out and mechanical, electrical, and plumbing (MEP) construction, so the pipe routing is more reasonable and you do not have to damage the finished interior later.
Chiller Placement
The chiller does not need to be pressed directly against the tub or the wall. Prioritize heat dissipation and maintenance space, while keeping the pipe distance to the tub as short as possible.
If the chiller is too far from the tub, the pipes become longer; if it is too close to the wall, heat dissipation and access for maintenance can be affected. So the chiller’s position should leave room for heat dissipation and servicing. Do not seal it completely inside a cabinet just to save space — that affects heat dissipation and makes later maintenance troublesome.
If the chiller is placed in an equipment room, a basement, or near a cabinet, pay attention to air circulation around it. The equipment needs to discharge heat while running; if the space is too enclosed, it may affect the operating environment.
ColdChiller Indoor Cold Plunge Project Support
Installing an indoor cold plunge is not just about choosing the tub and chiller sizes. It also requires planning that takes into account the on-site space, the number of users, plumbing, drainage, and later maintenance. This is especially true for projects such as basements, home gyms, spas, and hotels — if drainage and equipment maintenance space are not considered early on, the cost and difficulty of retrofitting later will both increase.
ColdChiller offers cold plunge tubs, chillers, and related supporting products, with customization available in different sizes, materials, and configurations. For dealers, gyms, spas, hotels, and other projects, we can help confirm the equipment and plumbing solution based on the tub size, the expected number of users, the installation space, the on-site drainage conditions, and the chiller configuration.
If you are planning an indoor cold plunge project, you can provide the on-site dimensions and installation conditions. We can then confirm the equipment configuration, pipe connections, drainage method, and later maintenance space, and provide the corresponding product and technical documentation.
FAQs
Question1: Do you need a floor drain to install an indoor cold plunge?
Answer:Not necessarily. Without a floor drain, drainage can still be handled with a drain pump and a hose. The key is to determine the drainage path for a full water change in advance.
Question2:Is all the water around a cold plunge condensation?
Answer:Not necessarily. It could also be water carried in by people, splashing, or pipe leakage. If water keeps dripping from a fixed spot, check the pipes and fittings first.
Question3:Why does condensation form on the chiller pipes?
Answer:When the surface temperature of the low-temperature pipes drops below the dew point of the air, condensation forms. The colder the water, the higher the indoor temperature and humidity, and the poorer the pipe insulation, the more condensation you get.
Question4:What should you pay attention to when installing a cold plunge in a basement?
Answer:Focus on humidity, drainage, heat dissipation, and maintenance space. If there is no floor drain, confirm the pump head and pipe routing in advance. If a sump pit already exists, also confirm the capacity of the existing drainage system first.
Get A Quote

Contact Me
Related Post You May Also Like
Water Flow Insufficient for Water Chillers for Ice Bath: Causes and Solutions
[pac_divi_table_of_contents exclude_headings_by_class="include" included_headings="off|on|on|off|off|off" active_link_highlight="on" level_markers_3="icons" title_container_padding="10px|15px|10px|15px|true|false" title_container_bg_color="#333333"...

Best Cold Plunge Tub for Tall People: Buying Guide
[pac_divi_table_of_contents exclude_headings_by_class="include" included_headings="off|on|on|off|off|off" active_link_highlight="on" level_markers_3="icons" title_container_padding="10px|15px|10px|15px|true|false" title_container_bg_color="#333333"...
Chiller for cold plunge: Winter Drainage, Storage Guide
[pac_divi_table_of_contents exclude_headings_by_class="include" included_headings="off|on|on|off|off|off" active_link_highlight="on" level_markers_3="icons" title_container_padding="10px|15px|10px|15px|true|false" title_container_bg_color="#333333"...

Cold Plunge Tub Buying Guide: Commercial vs Home Use
[pac_divi_table_of_contents exclude_headings_by_class="include" included_headings="off|on|on|off|off|off" active_link_highlight="on" level_markers_3="icons" title_container_padding="10px|15px|10px|15px|true|false" title_container_bg_color="#333333"...
0 Comments